Basic - Creating a Service
什麼是 Service
在 Kubernetes 中,Service 是一種抽象層,用來將一組 Pod 暴露給外界或內部系統進行訪問。它提供了一個穩定的 IP 地址和 DNS 名稱,讓客戶端應用程式能夠通過這些地址與 Pod 進行通信,而不必關心 Pod 的具體 IP 地址或生命周期。Service 有多種類型,可以根據需求選擇合適的配置。
A Kubernetes Service is an abstraction which defines a logical set of Pods and a policy by which to access them.
Kubernetes Service 是個抽象化的概念,主要定義了邏輯上的一群 Pod 以及如何存取他們的規則。
Service 的基本概念
Kubernetes 中的 Service 有以下幾個關鍵功能:
- 抽象 Pod 的訪問:Pod 的 IP 地址是動態變化的,Service 能夠幫助外部或其他 Pod 不受這些變化的影響進行通信。
- 負載均衡:Service 會將流量分發到後端的 Pod,實現負載均衡。
- 提供穩定的 DNS 名稱:Kubernetes 會為每個 Service 分配一個 DNS 名稱,方便其他服務調用。
Service 的類型
Kubernetes 支持多種類型的 Service,每種類型的用途和工作方式有所不同:

1. ClusterIP(預設類型)
只在集群內部暴露 Service,客戶端只能在集群內部訪問,不會暴露外部訪問的入口。
2. NodePort
在每個節點上分配一個端口,外部可以通過這個端口訪問 Service。通常與外部負載均衡器一起使用。
3. LoadBalancer
通過雲提供商的負載均衡器將流量分發到 Service,這通常需要雲提供商的支持,例如 AWS、GCP 等。
4. ExternalName
使 Service 指向外部 DNS 名稱,而不是集群內的 Pod,適用於將 Kubernetes 內部的服務映射到外部服務。
Service 的工作原理
- 選擇 Pod
- Service 使用
selector來選擇一組 Pod,這些 Pod 是通過 label 來標識的。
- Service 使用
- 轉發流量:
- Service 接收來自客戶端的請求,根據負載均衡策略將流量轉發到符合 selector 條件的 Pod。
- DNS 解析:
- 每個 Service 都會自動獲得一個 DNS 名稱,例如
my-service.default.svc.cluster.local,其他 Pod 可以通過這個名稱來訪問該 Service。
- 每個 Service 都會自動獲得一個 DNS 名稱,例如
實作一個 Service
建立兩個 Pod 當作測試
- 因為我們需要建立兩個 image,分別是版本 1 和版本 2,因此我們透過 build 時代入參數的方式進行
main.go
package main

import (
	"net/http"
	"github.com/gin-gonic/gin"
)

// 定義一個變數,版本號會在構建時動態注入
var version = "v1"

func main() {
	router := gin.Default()
	router.GET("/", func(c *gin.Context) {
		message := "Hello world " + version + "!"
		c.JSON(http.StatusOK, gin.H{"data": message})
	})
	router.Run()
}
- 一樣執行 go mod init 和 go mod tidy 產生 go.mod 和 go.sum
go mod init main
---

go: creating new go.mod: module main
go mod tidy
---

go: finding module for package github.com/gin-gonic/gin
go: found github.com/gin-gonic/gin in github.com/gin-gonic/gin v1.10.0
- 因為建構時要帶入參數,因此 dockerfile 也需要在指令上帶上參數
dockerfile_v1
FROM golang:1.22.4-alpine3.20 as builder
# 定義一個參數,預設版本為 v1
ARG VERSION=v1
WORKDIR /
COPY main.go main.go
COPY go.mod go.mod
COPY go.sum go.sum
# 使用 ldflags 傳入版本參數
RUN go build -ldflags="-X main.version=${VERSION}" -o main
FROM alpine:3.20
WORKDIR /
COPY /main .
EXPOSE 8080
ENTRYPOINT ["./main"]
- 建立 V1 和 V2 的 image,在 docker build 的時候帶入參數,他就會自動往內傳到 go 的應用程式上
docker build -t hello-world:v1.0.0 --build-arg VERSION=v1 .
---

[+] Building 106.5s (15/15) FINISHED                                                                                                                            docker:default
 => [internal] load build definition from dockerfile
 ...中間省略...
 => => naming to docker.io/library/hello-world:v1.0.0
docker build -t hello-world:v2.0.0 --build-arg VERSION=v2 .
---

+] Building 102.5s (13/13) FINISHED                                                                                                                            docker:default
 => [internal] load build definition from dockerfile
 ...中間省略...
 => => naming to docker.io/library/hello-world:v2.0.0
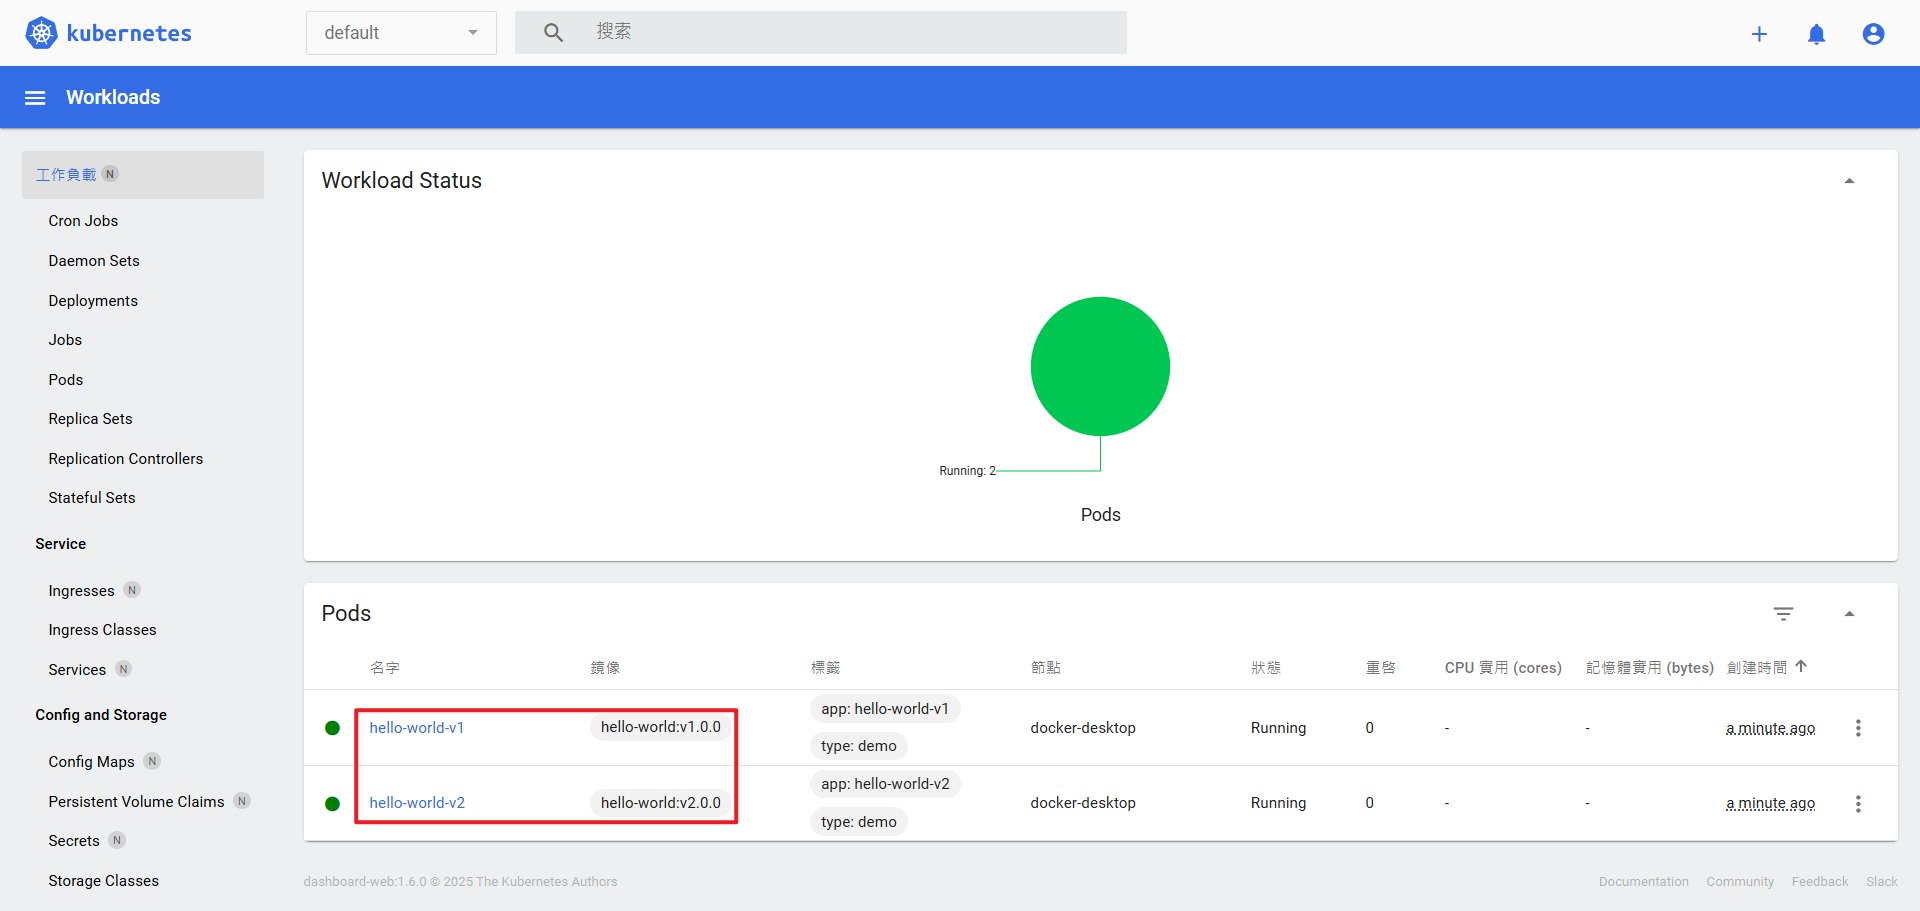
- 創立一個 pod 的 yaml 檔案,透過 kubectl 來創建這兩個 pod,名稱分別為 hello-world-v1 和 hello-world-v2,中間可以使用---將他們分開,當然在 dashboard 中也能看到他們
pod.yaml
apiVersion: v1
kind: Pod
metadata:
  name: hello-world-v1
  labels:
    app: hello-world-v1
    type: demo
spec:
  containers:
  - name: hello-world-v1
    image: hello-world:v1.0.0
    ports:
    - containerPort: 8080
---
apiVersion: v1
kind: Pod
metadata:
  name: hello-world-v2
  labels:
    app: hello-world-v2
    type: demo
spec:
  containers:
  - name: hello-world-v2
    image: hello-world:v2.0.0
    ports:
    - containerPort: 8080
kubectl.exe apply -f pod.yaml
---

pod/hello-world-v1 created
pod/hello-world-v2 created
- 接下來我們可以透過 port-forward 的技術,來測試這兩個 pod 是否個別回應都正常,首先先執行 port-forward 然後不要關閉,再開另一個終端機,測試 OK 後兩個關掉,在進行下一個 Pod 測試
kubectl.exe port-forward hello-world-v1 8080:8080
---

Forwarding from 127.0.0.1:8080 -> 8080
Forwarding from [::1]:8080 -> 8080
(Invoke-WebRequest -Uri http://localhost:8080 -UseBasicParsing).Content
---

{"data":"Hello world v1!"}
kubectl.exe port-forward hello-world-v2 8080:8080
---

Forwarding from 127.0.0.1:8080 -> 8080
Forwarding from [::1]:8080 -> 8080
(Invoke-WebRequest -Uri http://localhost:8080 -UseBasicParsing).Content
---

{"data":"Hello world v2!"}
使用 Service 實現 Load Balance
- 建立一個 service.yaml,並設定為 load balance,並將本機的 8000 port 映射到 pod 裡面的 8080 port
service.yaml
apiVersion: v1
kind: Service
metadata:
  name: my-service
spec:
  selector:
    type: demo
  type: LoadBalancer
  ports:
    - protocol: TCP
      port: 8000
      targetPort: 8080
- 利用 kubectl 來執行他
kubectl.exe apply -f service.yaml
---

service/my-service created
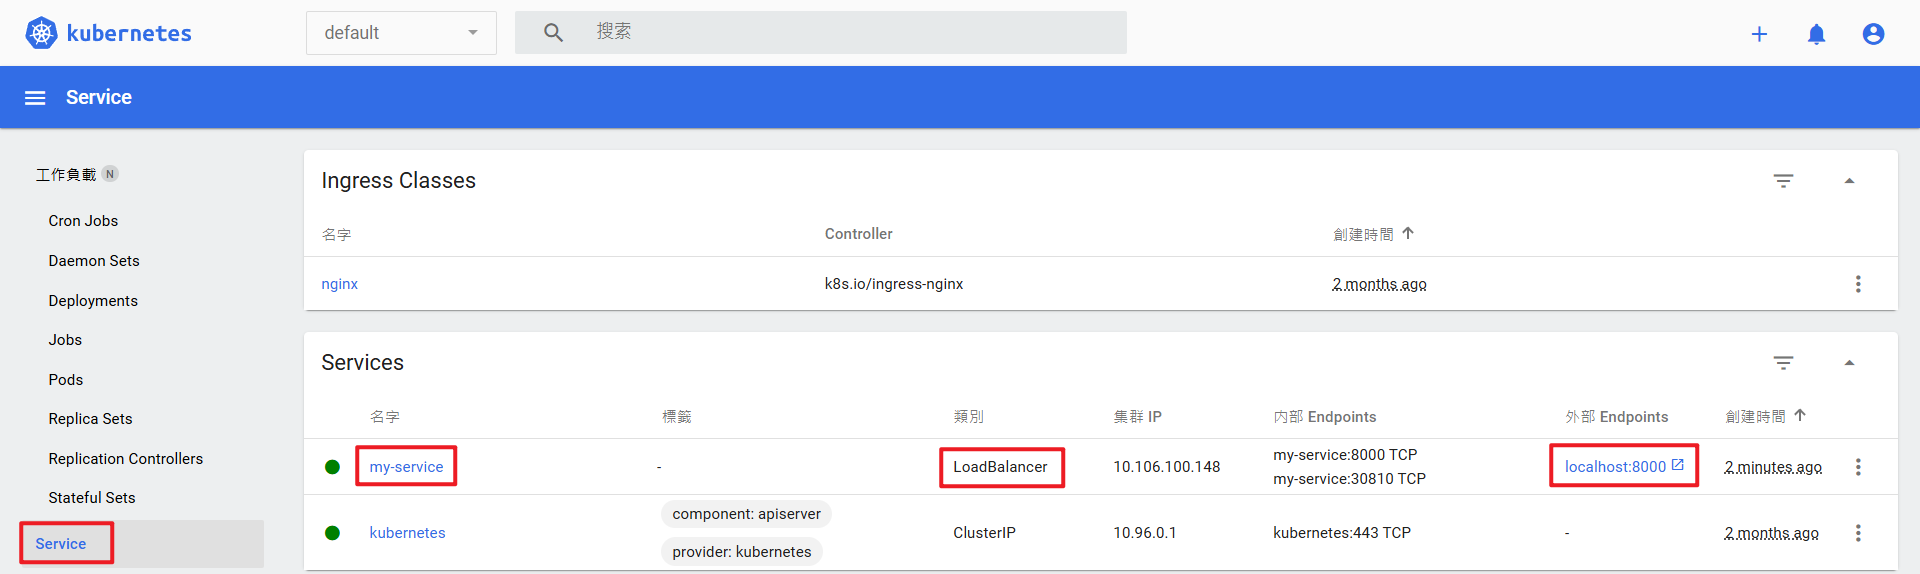
- 查看目前所有元件的狀態,dashboard 也能看到 service
kubectl.exe get all
---

NAME                 READY   STATUS    RESTARTS   AGE
pod/hello-world-v1   1/1     Running   0          13m
pod/hello-world-v2   1/1     Running   0          13m

NAME                 TYPE           CLUSTER-IP       EXTERNAL-IP   PORT(S)          AGE
service/kubernetes   ClusterIP      10.96.0.1        <none>        443/TCP          86d
service/my-service   LoadBalancer   10.106.100.148   localhost     8000:30810/TCP   60s
- 在不同的終端機上面測試有沒有 Load Balance,網址http://localhost:8000記得是 8000 的 port 喔!
(Invoke-WebRequest -Uri http://localhost:8000 -UseBasicParsing).Content
---

{"data":"Hello world v1!"}
(Invoke-WebRequest -Uri http://localhost:8000 -UseBasicParsing).Content
---

{"data":"Hello world v2!"}

刪除 Service
- 如果我想要刪除 Service,只需要用 delete 的指令就可以了,也可以搭配之前部版的 yaml 就可以了
kubectl.exe delete -f service.yaml
---

service "my-service" deleted
刪除 Pod
- 如果我想要刪除 Pod,同上面的做法一樣,就能刪除了
kubectl.exe delete -f pod.yaml
---

pod "hello-world-v1" deleted
pod "hello-world-v2" deleted
- 查看目前所有元件是否都刪除了
kubectl.exe get all
---

NAME                 TYPE        CLUSTER-IP   EXTERNAL-IP   PORT(S)   AGE
service/kubernetes   ClusterIP   10.96.0.1    <none>        443/TCP   86d